How to install PyTorch Nvidia GPU stack on Ubuntu LTS 22.04 (late 2022 – early 2023)

Installing PyTorch has no business being so complicated on Linux as it still is in late 2022.

The main problem is that there are four independently moving parts and very little guidance on how to align them:

  • Python version
  • PyTorch version
  • CUDA version
  • Nvidia drivers version
  • GPU card

On the first impression, it should work easily no? After all, conda is the de-facto queen of scientific computing, both Pytorch and Nvidia provide configurators for command-line, platform specific installations, PyTorch installation and CUDA drivers installation. Ubuntu is relatively “mainstream” and “corporate”, meaning that there is a single-click choice to install proprietary drivers from NVIDIA that are automatically determined based on the GPU card you have

Right?

Wrong.

For anyone who had a shot at trying to install PyTorch has realized there is an interdependence that’s not always easy to debug and resolve. After a couple of weeks lost a year ago, I was aware of the problem when I was starting to configure a new machine for ML work, but I still lost almost half a day to debug it and make it works.

Specifically, the problem was that NVIDIA CUDA version is currently at 12 (12.1 specifically), whereas the latest version of PyTorch wants 11.6 or at least 11.7, not even the last 11 series release – the 11.8.

For that, we will need to start by checking PyTorch requirements on the official site and choose the last compatible CUDA version. Here it is 11.7.

After that, we go and locate in the CUDA releases archives the relevant version. Here it is the CUDA-11.7.1. However, there is a catch-22 here. The default web installer any sane user would use (add key to keyring + apt-get install) will actually install CUDA-12. Yuuuup. And the downgrading experience is not the best, nor the most straightforward. So you MUST use a local installer command, that pins the version (here).

However, this is not it yet. Before installing CUDA, you need to make sure you have the proper drivers version, that are compatible with CUDA and the graphics card.

The current drivers version for Linux for NVIDIA drivers is 525.XX.XX for my graphics according to Nvidia’s reverse compatibility, fortunately for me it works with CUDA 11.7, otherwise a compatibility pack would have been needed. Moreover, your graphic cards might not be supported by the latest NVIDIA drivers, in which case you would need to work backwards to find the last release of PyTorch and connected packages that would still be supporting the CUDA stack you have access to.

Fortunately for me, it was not the case, so I could start installing things from there.

So:

This could and should have been a one-liner with automated dependencies resolution or at least part of the installation stack on the Pytorch website.

It isn’t.

It’s an outdated installation procedure straight from the 1990s, with user figuring out dependencies and resolving unexpected behaviors from those dependencies.

In 2022 we can and usually do better than that.

Especially for a major toolchain used by millions.
Problems with a major programming language version bump (Python 2>3)

After about 10 years after the initial Python 3 release and about six months after the end of Python 2 support I have finally bumped my largest and longest-running project to Python 3. Or at least I think so. Until I find some other bug in a rare execution path.

BioFlow is a python project of mine that I have been on-and-off running and maintaining since 2013 – by now almost 7 years. Heavily dependent on high-performance scientific computing libraries and python libaries providing bindings to them (cough scikits.sparse cough), despite Python 3 being out for a couple of years by the time I started working on it none of the libraries I depended supported it yet. So I got on with Python 2 and rolled for it for a number of years. By that time, with several refactors, feature creep and optimization, with about 6.5 k LOC, 2.5 k Lines of comments, 665 commits over 7 years and a solid 30% of test coverage, it is a middle-of-the road python work-horse library.

As many other people running scientific computing libraries I did see a number of things impacting the code: bugs being introduced into the libraries I depended on (hello library version pinning), performance degradation due to anti-spectre attacks on Intel CPUs, libraries disappearing for good (RIP bulbs), databases discontinuing support for the means accessing them I was using (why, oh why neo4j did you drop REST) or host system just crapping itself trying to install the old Fortran libraries that have not yet been properly packaged for it (hello Docker).

Overall, it taught me a number of things about programming craftsmanship, writing quality code and debugging code I forgot the details about. But that’s a topic for another post – back to Python 2 to 3 transition.

Python 2 was working just fine for me, but with its end of life coming near, proper async support and type hinting being added to it, a switch to Python 3 seemed like a logical thing to do to ensure a long-term support.

After several attempts to keep a codebase in Python 2 consistent with Python 3

So I forked off a 2to3 branch and ran the 2to3 script in the main library. At first it seemed that it should have solved most of issues:

  • print xyz was turned into print(xyz)
  • dict.iteritems() was turned into dict.items()
  • izip became zip
  • dict.keys() when fed to an enumerator was turned into list(dict.keys())
  • reader.next() was turned into next(reader)

So I gladly tried to start running my test suite, only to discover that it was completely broken:

  • string.lower("XYZ") now was “XYZ".lower()
  • file("fname", 'w') was now an open("fname", 'w')
  • but sometimes also open("fname", 'wr')
  • and sometimes open("fname", 'rt') or open("fname", 'rb') or open("fname, 'wb'), depending purely on the ingesting library
  • AssertDictEqual or assertItemsEqual (a staple in my unit test suite) disappeared into thin air (guess assertCountEqual will now have to do…)
  • wtf is even with pickle dumps ????

Not to be forgotten that to switch to Python 3 I had to unfreeze dependencies for the libraries I was building on top, which came with its own cans of worms:

  • object.properties[property] now became an object._properties[property] in one of the libraries I heavily depended on (god bless whoever invented Ctrl-F and PyCharm for it’s context-aware class/object usage/definition search)
  • json dumps all of a sudden now require an explicit encoding, just as hashlib digests

And finally, after running for a couple of weeks my library, some previously un-executed branch triggered a bunch of exception arising from the fact that in Python 2 / meant an integer division, unless a float was involved, whereas for Python 3 / is always a float division and an // is needed to trigger an integer division.

I can be in part blamed for those issues. A code with complete unit test coverage would have caught all of the exceptions in the unit-test phase and the integration tests would have caught problems in rare codepaths.

The problem is that no real-life library have a total unit-test or coverage library. Python 3 transition trench warfare hell have killed a number of popular python projects – for instance Gourmet recipe manager (I used to use myself). For hell’s sake, even DropBox, who employs Guido himself and runs a multi-billion business on an almost pure Python stack waited until end 2018 and took about a year to roll-over.

The reality is that the debugging of a major language version bump is **really** different from anything a codebase encounters in its lifetime.

When you write a new feature, you test it out as you develop. Bugs appear as you add lines of code and you can track them down. When a dependencies craps out, the bugs that appear are related to it. It is possible to wrap it and isolate the difference in its response to calls. Debugging is localized and traceable. When you refactor, you change the model of the problem and code organization in your head. The bugs that appear are once again directly triggered by your code modifications.

When the underlying language changes, the bugs appear **everywhere**. You don’t know which line of code could be at the bugged one, and you miss bugs because some bugs obscure other bugs. So you have to do pass after pass after pass of your entire codebase, spending weeks and months tracking exceptions as they pop up and never sure if you have corrected all the bugs yet. It is hard, because you need to load the entire codebase in your head to search for bugs, be aware of the corner cases. It is demoralizing, because you are just trying to get to the point where your code already was, without improving it in any way possible.

It is pretty much a trench warfare hell – stuck in the same place, without clear advantage gained by debugging excursions at the limit of your mental capacities. It is unsurprising that a number of projects never made it to Python 3, especially niche ones made by non-developers and for non-developers – the kind of projects that made Python 2 a loved, universal language that surely would have a library that could solve your niche problem. The problem is so severe in the scientific community, that there is a serious conversation in Nature about starting to use Python 2.7 to maximise projects reproductibility, given it is guaranteed it will never change/

What could have been improved? As a rank-and-file (non-professional) developer of a niche, moderately complex library here’s a couple of things that would have my life **a lot** easier while bumping the Python version:

  • Provide a tool akin to 2to3 and make it default path. It was far from perfect – sure. But it hammered out the bulk of the differences and allowed to code to at least start executing and me – to start catching bugs.
  • Unlike 2to3, it needs to annotate potential problems in the code it could not resolve. 'rt' vs 'rb' was a direct consequence for the text vs byte separation in Python 3 and it was clear problems will arise with that. Same thing for / vs //. 2to3 should have at least high-lighted potential for problems. For me my workflow, adding a # TODO: potential conflict that needs resolution would have gone a loooooong way.
  • Better even, roll out a syntax change in the old language version that will allow the developer to explicitly resolve the ambiguity so that the automated upgrade tools can get more out of the library
  • Don’t touch the unittest functions. They are the lifeblood of the debugging of the library after the language bump. If they bail out, getting them to work would require figuring out how the code they are covering works once again and defeats their purpose.
  • Make sure that the most wide-spread libraries in your ecosystem have performed a roll-over before pushing others to do the same.
  • Those libraries need to provide a “bump” version: aka with exactly the same call syntax from the users code, they would return exactly the same results both in the previous and the new version of the language. Aka the libraries should not be bumping their own major version at the same time they bump the supported langage version.

Mathematica: encapsulation impossible

Among the most frustrating languages I’ve encountered so far, Mathematica definitely ranks pretty high. Compared to it, R, the master troll of statistical languages pales in comparison. At the moment of writing this post I’ve just spend two hours trying to wrap a function that I manage to make work in the main namespace into a Module that I would call with given parameters. Not that I am a beginner programmer, or that I am not familiar with LISP and symbolic languages or meta-programming. Quite to the opposite. Despite an awesome potention and regular media attention, Mathematica is an incredibly hard language to properly program in, no matter what your background is.

Impossible functionalization.

So I’ve just spend two hours trying to re-write three lines of code I was already using as a stand-alone notebook. In theory (according to Mathematica), it should be pretty simple: define a “Method[{variables,  operations}]”, and replace operations with the commands from my notebook I would like to encapsulate and variables with variables I would like to be able to change in order to modify the behavior of my code.

The problem is that never worked. And no matter how in depth I was going into the documentation of the Method[.., ..] and individual commands I was going, I could not figure out why.

You have an error somewhere, but I won’t tell where

One of the main reasons for frustration and failure on the way of debugging. Mathematica returns error WITHOUT STACK, which means that the only thing you get is the name of the error and the link towards the official documentation that explains where the error might come from in very general terms (20 lines or less).

The problem is that since your error most likely won’t occur until the execution stack hits the internals of other functions, by the time your error is raised and returned to you, you have no freaking idea of:

a) Where the error was raised
b) What arguments raised it
c) What you need to do get to the desired behavior

And since the API/implementation of individual functions is nowhere to be found, your best chance is to start randomly changing your code until it works. Or go google different combination of your code and/or errors, hoping that someone already run into an error similar to yours in similar conditions and found out how to correct it.

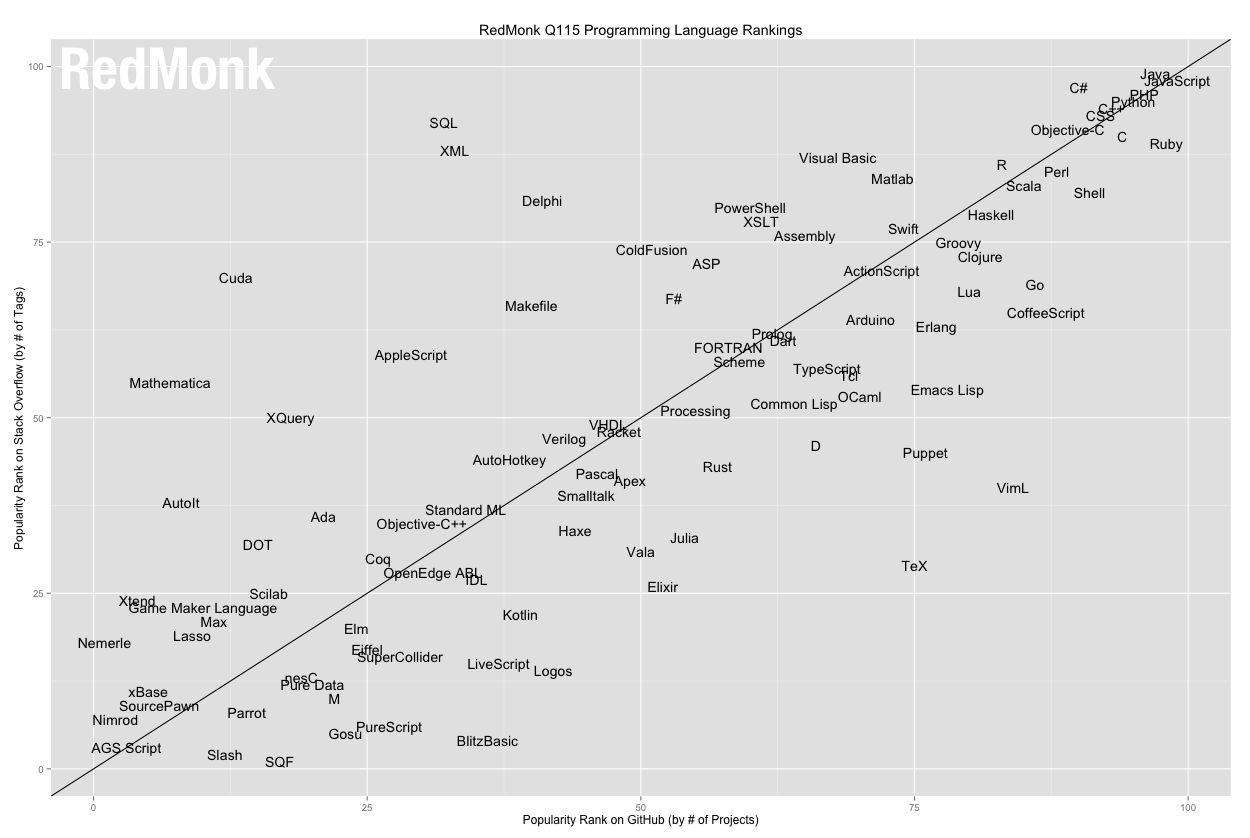
Which actually really blows out of proportion the ration of questions asked about Wolfram Language compared to the output it provides:

Yup. The only programming language to have its own, separate and very active stack exchange, and yet REALY, REALY, inferior compared to MATLAB and R, its closest domain-specific cousins. Actually with regard to output it provides it is buried among the languages you’d probably never heard about.

You might have an error, but I won’t tell you

In addition to returning stackless errors, Mathematica is a fail-late language, which means it will try to convert and transform the data silently to force it through the function until it fails. This two error management techniques on their own are already pretty nasty and have been cleaned away from most commonly used languages, so their combination is pretty disastrous on its own.

However, Mathematica does not stop there in further making error detection a challenge. Mathematica has several underlying basic operation models, such as re-writing, substitution or evaluation, which correspond to the same concepts, but do very different things to exactly same data. And they are arbitrarily mixed and NEVER EXPLICITLY MENTIONED IN THE DOCUMENTATION.

Multiple basic operations is what makes this language powerful and suited for abstraction and mathematical  computation. But since they are arbitrarily mixed without being properly documented, the amount of error they generate and debugging they require is pretty insane and offsets in a large part the comfort they provide.

No undo or version control

Among the things that are almost as frustrating as the Mathematica errors is the execution model of Wolfram language.  Mathematica workbooks (and hence the code you are writing) are first-class objects. Objects on which the language reasons on itself and which might get modified extensively upon execution. Which is an awesome idea.

What is much less awesome is the implementation of that idea. In particular the fact that the workbook can get modified extensively upon execution means that reconstructing what the code looked like before the previous operation might be impossible. So Mathematica discards the whole notion of code tracking.

Yes, you read it right.

Any edits to code are permanent. There is also absolutely no integration with version control, making an occasional fat-finger error of delete-evaluate a critical error that will make you loose hours of work. Unless you have 400 files to which you’ve “saved as” the notebook every five minutes.

You just don’t get it

In all this leaves a pretty consistent impression that language designers had absolutely no consideration for the user, valuing much less user’s work (code) then theirs, and showing it in the complete absence of safeguards of any kind, proper error tracking or proper code modification tracking. All of which made their work of creating and maintaining the language much easier at the expense of making user’s work much, much harder.

A normal language would get over such initial period of roughness and round itself by a base of contributors and a flow of feed-back from users. However Mathematica is a closed-source language, developed by a selected few, who would snob user’s input and instead of improving the language based on the input would persist in explaining to those trying to provide them feedback how the users “just don’t get it”.

For sure, Mathematica has a lots of great power to it. Unfortunately this power remains and will remain inaccessible to the vast majority of the commoners because of impossible syntax, naming convention and debugging experience straight from an era where just pointing to a line of code where the error occurred was waaay beyond the horizon of possible

Installing scikit.sparse on CentOS or Fedora

Step 1: install the METIS library:

1 ) Install cmake as described here:

http://pkgs.org/centos-6-rhel-6/atrpms-testing-x86_64/cmake-2.8.4-1.el6.x86_64.rpm.html,

For the lazy:

– Dowload the latest atrpms-repo rpm from

http://dl.atrpms.net/el6-x86_64/atrpms/stable/

– Install atrpms-repo rpm as an admin:

# sudo rpm -Uvh atrpms-repo*rpm

– Install cmake rpm package:

# yum --enablerepo=atrpms-testing install cmake

2) Install either the GNU make with

# yum install make

or the whole Development tools with

# yum groupinstall "Development Tools"

3) Download METIS from http://glaros.dtc.umn.edu/gkhome/metis/metis/download and follow the instructions in the “install.txt” to actually install it:

– adjust the include.metix.h to adjust the length of ints and floats to better correspond to your architecture and wanted precision (32 or 64 bits)

-execute:

$ make config 
$ make 
# make install

Step 2: Install SuiteSparse:

1) Download the latest version from http://www.cise.ufl.edu/research/sparse/SuiteSparse/, untar it and cd into it

2) Modify the SuiteSparse_config.SuiteSparse_config.mk INSTALL_INCLUDE variable :

INSTALL_INCLUDE = /usr/local/include

3) Build and install it

$ make 
# make install

Step 3: Install the scikit.sparse:

1) Download the latest scikit.sparse from PiPy:

2) in setup.py edit the last statement so that it looks like this:

Extension("scikits.sparse.cholmod",
         ["scikits/sparse/cholmod.pyx"],
         libraries=["cholmod"],
         include_dirs=[np.get_include()].append("/usr/local/include"),
         library_dirs=["/usr/local/lib"],
),

Step 4:

Well, the scikit.sparse imports well at this point, but if we try to import scikits.sparse.cholmod, we have an Import error, where our egg/scikits/sparse/cholmod.so fails to recognize the amd_printf symbol….

Hmmm. Looks like there is still work to be done to get it all working correctly…

Scipy Sparse Matrixes and Linear Algebra

If you need to do a LU decomposition of a Scipy Sparse Matrix (pretty useful for solving systems of differential equations), keep in mind that Cholesky decomposition is generally more stable and rapid for the Hermitian Symmetric positive definite matrixes. In my case, the default LU decompsition method from scipy.sparse.linalg was failing because of the procedural problems.

However you cannot just apply Numpy.linalg.cholesky because the a scipy.sparse.lil_matrix is seen as a linked list and is not a 2D matrix. A solution for this is to use the cholesky decomposition from the scikit.sparse module

Installing and using a neo4j server on a CentOS server

First of all, if you have weird errors while trying to install neo4j server on a machine running under CentOS, it looks like you are trying to perform installation from a folder within your $HOME directory. Which the newly created neo4j user (if you do a default installation) won’t be able to access. In order to avoid it, unpack the neo4j-community-x.x.x package to the /opt/ directory and

You will also need to install the Oracle Java to support the neo4j installation. A good explanation of how to do it can be found on the ubuntu stack overflow. To sum up:

sudo apt-get install python-software-properties
sudo add-apt-repository ppa:webupd8team/java
sudo apt-get update
sudo apt-get install oracle-java8-installer
sudo apt-get install oracle-java8-set-default

Only install oracle java as default if you don’t have other programs relying on the

If you meet the “java heap out of space error”, what you have to do is to go to the $NEO4J_HOME directorty (where you’ve installed the neo4j files), then to config and then in the neo4j-wrapper.conf file edit the following lines:

wrapper.java.initmemory = 64
wrapper.java.maxmemory = 512 (increase to 1-4 Gb if you have >4Gb of RAM)

Installing 2.7 parallel python stack + a couple of modules under CentOS 6

On CentOS 5 and 6 you unfortunately cannot install a newer version of python instead of the default one, because the package controller “yum” depends on it. The only way to go is to make an altinstall. The following article describes it really well:

http://toomuchdata.com/2012/06/25/how-to-install-python-2-7-3-on-centos-6-2/

in order to make python2.7 command available to the root now (typically for the module installation), add python2.7 to root’s path:

PATH=$PATH:/usr/local/bin
export PATH

Now you can safely install all the fancy python modules you want. Well, almost all.

Building Scipy with alternative install of Python isn’t really a piece of cake neither, since it requires to first install LAPACK, ATLAS and BLAS packages, which is not completely direct for complete newcomers. This tutorial explains well how to do it exactly:

http://www.shocksolution.com/2011/08/how-to-build-scippy-with-python-2-7-2-on-centos5/

Btw, once you’ve installed all the modules listed in the link above, you can just do

sudo pip install scipy

and wait until it finishes compiling.

Enjoy!

Mastering Groovy

So, since I want to work with neo4j through bulbs, it seems that I have no other option but to use Groovy Gremlin.

Installation of groovy on Eclipse: through marketplace. Quite easy.

First attempt to use: install gremlin from Tinkerpop and access it from Groovy programming shell in eclipse. After about an hour of furious googling, it seems that a couple of libraries need to be included in the groovy shell to launch the gremlin from within groovy:

gremlin$ groovysh -cp $GREMLIN_HOME/lib/gremlin-groovy-2.3.0.jar:$GREMLIN_HOME/lib/gremlin-java-2.3.0.jar:$GREMLIN_HOME/lib/pipes-2.3.0.jar:$GREMLIN_HOME/lib/common-1.7.jar:$GREMLIN_HOME/lib/groovy-1.8.9.jar

To do the same thing from Eclipse, Project>Properties>JavaBuild Path>Add External Jars and then add:

  • $GREMLIN_HOME/lib/gremlin-groovy-2.3.0.jar
  • $GREMLIN_HOME/lib/gremlin-java-2.3.0.jar
  • $GREMLIN_HOME/lib/pipes-2.3.0.jar
  • $GREMLIN_HOME/lib/common-1.7.jar
  • $GREMLIN_HOME/lib/groovy-1.8.9.jar
  • A couple of concepts of efficient programming

    As I am trying to use python to build a rather large software solution for use in bioinformatics, I am slowly realizing that there are lots of concepts I really need, that were never taught in my CS courses. Among them: