Mathematica: encapsulation impossible

Among the most frustrating languages I’ve encountered so far, Mathematica definitely ranks pretty high. Compared to it, R, the master troll of statistical languages pales in comparison. At the moment of writing this post I’ve just spend two hours trying to wrap a function that I manage to make work in the main namespace into a Module that I would call with given parameters. Not that I am a beginner programmer, or that I am not familiar with LISP and symbolic languages or meta-programming. Quite to the opposite. Despite an awesome potention and regular media attention, Mathematica is an incredibly hard language to properly program in, no matter what your background is.

Impossible functionalization.

So I’ve just spend two hours trying to re-write three lines of code I was already using as a stand-alone notebook. In theory (according to Mathematica), it should be pretty simple: define a “Method[{variables,  operations}]”, and replace operations with the commands from my notebook I would like to encapsulate and variables with variables I would like to be able to change in order to modify the behavior of my code.

The problem is that never worked. And no matter how in depth I was going into the documentation of the Method[.., ..] and individual commands I was going, I could not figure out why.

You have an error somewhere, but I won’t tell where

One of the main reasons for frustration and failure on the way of debugging. Mathematica returns error WITHOUT STACK, which means that the only thing you get is the name of the error and the link towards the official documentation that explains where the error might come from in very general terms (20 lines or less).

The problem is that since your error most likely won’t occur until the execution stack hits the internals of other functions, by the time your error is raised and returned to you, you have no freaking idea of:

a) Where the error was raised
b) What arguments raised it
c) What you need to do get to the desired behavior

And since the API/implementation of individual functions is nowhere to be found, your best chance is to start randomly changing your code until it works. Or go google different combination of your code and/or errors, hoping that someone already run into an error similar to yours in similar conditions and found out how to correct it.

Which actually really blows out of proportion the ration of questions asked about Wolfram Language compared to the output it provides:
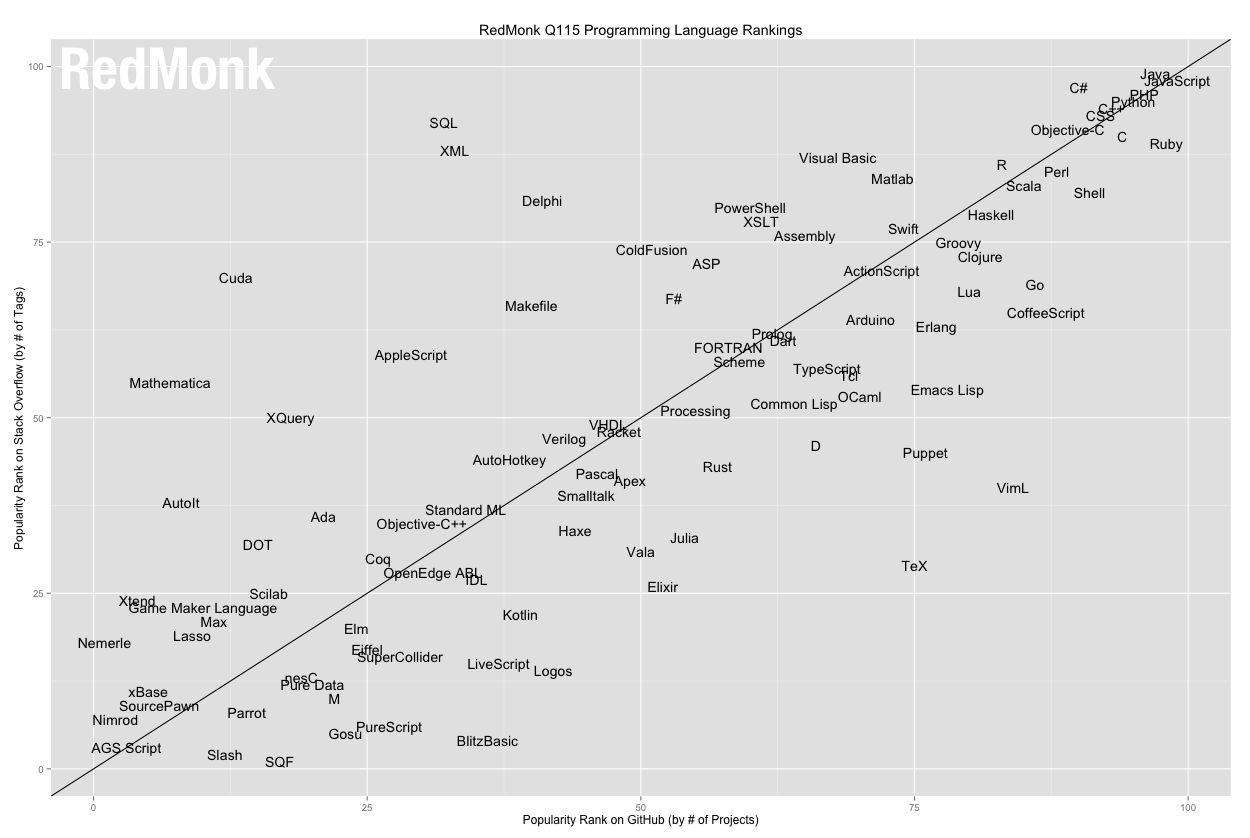
Yup. The only programming language to have its own, separate and very active stack exchange, and yet REALY, REALY, inferior compared to MATLAB and R, its closest domain-specific cousins. Actually with regard to output it provides it is buried among the languages you’d probably never heard about.

You might have an error, but I won’t tell you

In addition to returning stackless errors, Mathematica is a fail-late language, which means it will try to convert and transform the data silently to force it through the function until it fails. This two error management techniques on their own are already pretty nasty and have been cleaned away from most commonly used languages, so their combination is pretty disastrous on its own.

However, Mathematica does not stop there in further making error detection a challenge. Mathematica has several underlying basic operation models, such as re-writing, substitution or evaluation, which correspond to the same concepts, but do very different things to exactly same data. And they are arbitrarily mixed and NEVER EXPLICITLY MENTIONED IN THE DOCUMENTATION.

Multiple basic operations is what makes this language powerful and suited for abstraction and mathematical  computation. But since they are arbitrarily mixed without being properly documented, the amount of error they generate and debugging they require is pretty insane and offsets in a large part the comfort they provide.

No undo or version control

Among the things that are almost as frustrating as the Mathematica errors is the execution model of Wolfram language.  Mathematica workbooks (and hence the code you are writing) are first-class objects. Objects on which the language reasons on itself and which might get modified extensively upon execution. Which is an awesome idea.

What is much less awesome is the implementation of that idea. In particular the fact that the workbook can get modified extensively upon execution means that reconstructing what the code looked like before the previous operation might be impossible. So Mathematica discards the whole notion of code tracking.

Yes, you read it right.

Any edits to code are permanent. There is also absolutely no integration with version control, making an occasional fat-finger error of delete-evaluate a critical error that will make you loose hours of work. Unless you have 400 files to which you’ve “saved as” the notebook every five minutes.

You just don’t get it

In all this leaves a pretty consistent impression that language designers had absolutely no consideration for the user, valuing much less user’s work (code) then theirs, and showing it in the complete absence of safeguards of any kind, proper error tracking or proper code modification tracking. All of which made their work of creating and maintaining the language much easier at the expense of making user’s work much, much harder.

A normal language would get over such initial period of roughness and round itself by a base of contributors and a flow of feed-back from users. However Mathematica is a closed-source language, developed by a selected few, who would snob user’s input and instead of improving the language based on the input would persist in explaining to those trying to provide them feedback how the users “just don’t get it”.

For sure, Mathematica has a lots of great power to it. Unfortunately this power remains and will remain inaccessible to the vast majority of the commoners because of impossible syntax, naming convention and debugging experience straight from an era where just pointing to a line of code where the error occurred was waaay beyond the horizon of possible
Parsing Sphinx and Readthedoc.org

Stage 1:  building doc locally

Sphinx is an awesome tool and combined with ReadTheDocs it can deliver quite a punch when it comes to documenting the project and its API.  Unfortunately the introduction is pretty obscure when it comes to using the apidoc/autodoc modules.

To summarize a couple of hours of goggling and exploration:

sphinx-apidoc -fo docs/source my_project
sphinx-build docs/source docs/build

from sphinx.ext.apidoc, using the sphinx.ext.autodoc will build the autodoc-parseable .rst files that will then be read by the

For it to work properly it is critical to add the project ROOT directory into the setup file :

 sys.path.insert(0, 'path_to_project/project_folder')

In addition to that, if your module includes a “setup.py” or any other module using the “OptionParser”, this module needs to be excluded from the tree of .rst files generated by the “apidoc” module.

Stage 2: Sending it all to the RTFD

However things get funkier when it comes to loading everything to readthedocs

First,  when using the sphinx.est.autodoc, you need to import your own modules for the autodoc to parse them. Which means you also need to install the external library dependencies. Readthedocs allows this by activating the venv and installing all the required modules from a requirements.txt (requires some manipulation of the project settings, but in all it is a pretty painless operation). However, when the python modules you are trying ti import depend on C libraries, things go south very fast.

The option FAQ suggests is to use the Mocks library. However, their code doesn’t work for Python2.7 and they understate the extent of problems metaprogramming from the mock.Mock module can wreak in your code.

First, here is the proper mock and mock module import code:

class Mock(MagicMock):

    @classmethod
    def __getattr__(cls, name):
        return Mock()

    @classmethod
    def __getitem__(cls, name):
        return Mock()

MOCK_MODULES = [numpy, scipy, ...]
for mod_name in MOCK_MODULES:
    sys.modules.update({mod_name: Mock()})

Second, you will need to import ALL “modules.submodules” from which you are importing, else you will get a “sys.path” error.

MOCK_MODULES = [numpy, scipy, 'scipy.stats', ...]

Finally, for some reason our re-defined mock doesn’t subclass very well. Here is the error I got related to this:

class Meta(CostumNode):
TypeError: Error when calling the metaclass bases
    str() takes at most 1 argument (3 given)

And here is the code it originated from:

from bulbs.model import Node, Relationship  # replaced with Mock
from bulbs.property import String, Integer, Float, Bool # replaced with Mock
class CostumNode(Node): 
 element_type = "CostumNode"
 ID = String(nullable = False) 
 displayName = String() 
 main_connex = Bool()
 custom = String() 
 load = Float()
class Meta(CostumNode):
    element_type = "Meta"
    localization = String()

In the end, I finished by mocking out the module that was raising that error (provided it was imported from multiple modules)

MOCK_MODULES = [numpy, scipy, 'scipy.stats', 'mypackage.erroneousmodule,...]

And removing it from the tree generated by the sphinx.ext.apidoc.

Finally, a last step was to insert an “on_rtd” into setup to prevent python from installing C-modules that RTFD infrastructure cannot handle.

Instead of conclusions:

Reathedoc.org and Sphinx autodoc/apidoc are definitely steps in the right direction regarding project and API documentation.

However the interface is still pretty brutal and even for a seasoned programmer getting it anywhere to working required a full day of googling, experimentation, error log parsing and harassing the stackoverflow.

If the goal is to get the newbies or inexperienced programmers with narrow expertise domain (cough, scientific computing, cough) to document their projects right, the effect of Sphinx/Readthedoc is right now almost opposite.

I tried it for the first time in 2013. The experience scarred me so much I kept delaying making the whole chain work until 2015, mostly because of pretty obscure documentation (heads up to Yael Grossman for noticing it back in 2012).

As a way to improve that situation, I would suggest an option to add to readthedocs a way of uploading pre-build html pages or to sphinx.ext.autodoc a way to generate intermediate .rst files so that autodoc only needs to be run locally, not on the readthedocs servers with all the problems that ensue. An alternative would be to modify the sphinx-quickstart so t/at it builds a config file compatible with readthedocs requirements right away.

Update on 01/08/16:

I was able to include my readme.md file after translating it to readme.rst thanks to pandoc thanks to the rst ..include: instruction. Awesome!

However it seems that now the RTFD pull interface is broken again and it can’t find Sphinx’s config.py or does not execute it before performing the set-up. So my modules are not mocked and the build fails. After some investigation, I had to set-up a conditional pull in the setup.py that would pull only non-C extensions in when the $READTHEDOCS is set to True.

Alt-install of Python on Ubuntu

Here is a very good link about how to do it: http://www.rasadacrea.com/en/web-training-courses/howto-install-python

To sum it up:

1. Install the dependencies for python compilation on Ubuntu:

sudo apt-get install build-essential python-dev
sudo apt-get install zlib1g-dev libbz2-dev libcurl4-openssl-dev 
sudo apt-get install libncurses5-dev libsqlite0-dev libreadline-dev 
sudo apt-get install libgdbm-dev libdb4.8-dev libpcap-dev tk-dev 
sudo apt-get -y build-dep python
sudo apt-get -y install libreadline-dev

2. Download and untar the relevant Python version (here 2.7.6):

wget https://www.python.org/ftp/python/2.7.6/Python-2.7.6.tgz
tar xfz Python-2.7.6.tgz

3. cd into the untared Python folder and run the configure and make scripts

cd Python-2.7.6
./configure
make

4. Make alt-install (it is important to make the alt-install and not install so that $python
returns the systsem version (question of stability) )

sudo make altinstall

5. Clean up

cd .. 
sudo rm -r Python-2.7.6*

6. Now you can access to different version of python:

  • the one that came originally:
which python
python
  • and the one you need for your other needs
which python2.7
python2.7

Installing dev versions of python on OS-X

Step1:  Go to the python official download page and download the python interpreter versions you are interested in.

Step2: Install them, by ctrl-clicking on the .mpkg file and choosing to open it with the installer (required to override the fact that the python interpreters are incompatible with the new Guardian secure installation system)

Step3: as described in pip installation guide:

–  issue interpreter version-specific setup tools install:

pythonX.X ez_setup.py

– install version-specific pip installation:

 pythonX.X get-pip.py

Step4: add the pip-X.X specific directory to your path:

nano ~/.bash_profile

and

export PATH=$PATH:/Library/Frameworks/Python.framework/Versions/X.X/bin

Now that you’re done, please verify that the clang is installed and is in your system path. If this is not the case you might experience some trouble installing python modules requiring to be compiled.

Add-on: to install LAPCKs and ATLAS (very useful for Scipy, follow this tutorial )

Installing TitanDB on a personal machine

Just to play around.

Step1: Install HBase:

follow http://hbase.apache.org/book/quickstart.html,

configuration variables:

hbase.rootdir = /opt/hadoop_hb/hbase
hbase.zookeeper.property.dataDir = /opt/hadoop_hb/zookeeper

putting it to the /opt/ file allows other users (such as specific database-attributed users) to access the necessary files without having to mix up with my /usr/ directory files.

Attention: since /opt/ belongs to root don’t forget to

sudo mkdir /opt/hadoop_hb
sudo chown <your_username> /opt/hadoop_hb

if you want to play with hbase from it’s shell

Attention: if youy are using Ubuntu, you will need to modify machine loopback, so that /etc/hosts look like:

127.0.0.1 localhost 
127.0.0.1 your_machine_name

Now you can start the hbase by typing

HBASE_HOME/bin/start-hbase.sh

and check if it is running by typing  in your browser

http://localhost:60010

(unless you’ve changed the default port h base connects itself to)

Step2: Install Elasticsearch:

For this download the elasticsearch.deb package from ElasticSearch official download website and run

sudo dpckg -i elasticsearch.deb

This will install the elasticsearch on your machine and add it to services launched from the start. Now you can check if it is working by typing in your browser (unless you’ve changed the default ports):

http://localhost:9200

Step3: Install TitanDB:

Once the HBase have been installed, download the TitanDB-Hbase .tar.gz and upack it into your directory of choice. once you’ve done with it, you can connect to it via gremling by typing

 gremlin> g = TitanFactory.open('bin/hbase-es.local')

to start it as a part of the embedded rexter server, configure type:

./bin/titan.sh config/titan-server-rexster.xml bin/hbase-es.local

Now you can check that the server is up and running by typing in your browser

http://localhost:8182/graphs

You’re done!

Correct way of modifying the PATH variable in ubuntu

Regardless the fact that many totorials recommend to modify ~./bashrc in order ot perform a permanent modification of PATH for a given user, this is not a way to go. According to the official Ubuntu StackExchange, the way to go is to use the ~/.pam_environment  folder, which is meant specifically for such modifications.

However, pay attention to the fact that you have to follow the pam_environment-specific synthax and thus type

PATH DEFAULT=${PATH}:/path/to/wherever/your/binaries/are

Using LyX for a report

LyX is a very simple and WSYG editor for latex documents, pretty well adapted to the new users, but enclosing the full power of Latex editors (and especially the freedom from all the options distraction that normal WSYG text editors are full of). However it’s first use might require some googling, so here is a couple of tips to speed up the proces:

inserting the references from Mendeley: http://onhavingwords.wordpress.com/2013/03/19/mendeley-lyx/

The margins should be set to 0.98” in order to reproduce the look and feeling of the MS Word / LO Writer.

Installing scikit.sparse on CentOS or Fedora

Step 1: install the METIS library:

1 ) Install cmake as described here:

http://pkgs.org/centos-6-rhel-6/atrpms-testing-x86_64/cmake-2.8.4-1.el6.x86_64.rpm.html,

For the lazy:

– Dowload the latest atrpms-repo rpm from

http://dl.atrpms.net/el6-x86_64/atrpms/stable/

– Install atrpms-repo rpm as an admin:

# sudo rpm -Uvh atrpms-repo*rpm

– Install cmake rpm package:

# yum --enablerepo=atrpms-testing install cmake

2) Install either the GNU make with

# yum install make

or the whole Development tools with

# yum groupinstall "Development Tools"

3) Download METIS from http://glaros.dtc.umn.edu/gkhome/metis/metis/download and follow the instructions in the “install.txt” to actually install it:

– adjust the include.metix.h to adjust the length of ints and floats to better correspond to your architecture and wanted precision (32 or 64 bits)

-execute:

$ make config 
$ make 
# make install

Step 2: Install SuiteSparse:

1) Download the latest version from http://www.cise.ufl.edu/research/sparse/SuiteSparse/, untar it and cd into it

2) Modify the SuiteSparse_config.SuiteSparse_config.mk INSTALL_INCLUDE variable :

INSTALL_INCLUDE = /usr/local/include

3) Build and install it

$ make 
# make install

Step 3: Install the scikit.sparse:

1) Download the latest scikit.sparse from PiPy:

2) in setup.py edit the last statement so that it looks like this:

Extension("scikits.sparse.cholmod",
         ["scikits/sparse/cholmod.pyx"],
         libraries=["cholmod"],
         include_dirs=[np.get_include()].append("/usr/local/include"),
         library_dirs=["/usr/local/lib"],
),

Step 4:

Well, the scikit.sparse imports well at this point, but if we try to import scikits.sparse.cholmod, we have an Import error, where our egg/scikits/sparse/cholmod.so fails to recognize the amd_printf symbol….

Hmmm. Looks like there is still work to be done to get it all working correctly…

Scipy Sparse Matrixes and Linear Algebra

If you need to do a LU decomposition of a Scipy Sparse Matrix (pretty useful for solving systems of differential equations), keep in mind that Cholesky decomposition is generally more stable and rapid for the Hermitian Symmetric positive definite matrixes. In my case, the default LU decompsition method from scipy.sparse.linalg was failing because of the procedural problems.

However you cannot just apply Numpy.linalg.cholesky because the a scipy.sparse.lil_matrix is seen as a linked list and is not a 2D matrix. A solution for this is to use the cholesky decomposition from the scikit.sparse module